YAHAMA
mellow
Project Brief:
Designing a pair of aesthetical speakers around existing components and mechanical principles.
Project Focus:
Handcraft prototyping
Timeline:
14 weeks project
The project has no direct affiliation with the brand.
Yamaha's pianos remain at the pinnacle of the industry. This enduring legacy inspired me to incorporate piano elements into the speaker.

The first upright piano in Japan

The first Yamaha grand piano
As the world's largest musical instrument manufacturer, Yamaha is involved in almost every field. The first product created by the Yamaha Corporation founder Torakusu Yamaha was Japan's first upright piano in 1900, and then the grand piano was made after that.
Moodbaord
Key Values: concise, elegant, modern


Ideations
Sketches (speaker + amplifier)
Infusing the design with elements reminiscent of the piano, including its iconic black and white keys and the timeless form of a grand piano.


Speaker Proportion Ideation
I began experimenting with the proportions of the speaker and amplifier digitally in 2D, evaluating the visual appeal.


Amplifier Proportion Ideation
Front View
Top View

Final Version Selection

For the final version, I curated this harmonious pair of speakers and amplifiers, fine-tuning the overall proportions for enhanced aesthetics and performance.


Yamaha's piano, elegant notes, through the air they dance,
Enhancing each moment, giving life a chance.
Elegant form, a visual delight,
In sound realms, they ignite.
Timbre, pitch, every tone,
Mellow speakers make a house a proper home.
Ebony, ivory, waves that sway,
Mellow's magic sweeps you away.
Mellow Amplifier


Mellow Speaker


Speaker grille cloth
Details

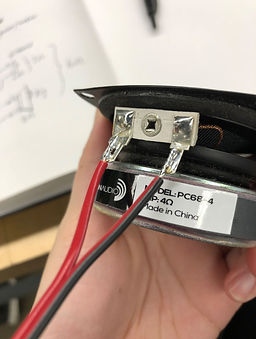
Audio input ports

Speaker Label
Dimensions


Prototype Process: Mellow's Design Journey
1. Prototype Trials
To become acquainted with the structure, I initially fabricated a basic speaker form using MDF and 1/8'' black acrylics, secured with glue.
I then tested various amplifier designs with laser-cut acrylics and precisely constructed the speaker using MDF. Subsequently, I added specific details to the front cover, including the speaker and screw holes.
Fine-tuned the speaker and amplifier proportions and experimented with different forms for the speaker's base.


2. Speakers Making & Sand & Paint
Applied shellac to the surface of the MDF speaker to prevent corrosion, followed by sanding with 500-grit sandpaper for a smooth finish.
Utilized Bondo to address gaps, then sanded with 500-grit sandpaper. This process was repeated at least twice, then sanding with higher grit sandpaper (800-1000) until the surface achieved a smooth texture.
Applied three coats of primer, progressively using higher grit sandpaper for each sanding session.

3. White Coat Spray
Now, it is time to spary the white "piano key."

4. Proof of Concept for AMP With 10 Pound Foam
Once satisfied with the amplifier's appearance, I began planning the placement of internal components and control knobs.

5. AMP Making
Having confirmed the concept's viability, I utilized 20-pound foam for the final amplifier construction, as the initial 10-pound foam didn't provide the necessary stability.
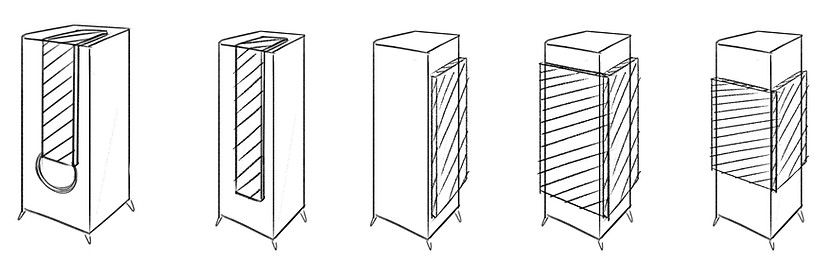
The AMP comprises three components: the top piece with an embedded compartment for the amp board and a cut-out for the volume button; a middle piece with openings for power and speaker input jacks; and a bottom piece for the enclosure.

6. Spray AMP
The 20-pound foam surface was first coated with shellac for protection, then sanded smooth using 500-grit sandpaper. Any holes were filled with Bondo before applying primer coats. This same process was repeated for the speaker.

7. Seal Coat Spray
Sprayed a coat of black paint to the amplifier.
Now, they are set for completion with applying a seal coat.

8. AMP Support Making Process
-
Prepared a well-mixed 50:50 ratio of white and green silicone RTV.
-
Fashioned a base for the foot.
-
Enclosed it with acrylic boards.
-
Placed it in a low-temperature oven and heated it for 15 minutes.
-
Removed the acrylic walls, fully submerging the entire foot with an additional layer of silicone mixture.
-
Heated it again for another 15 minutes.
-
Removed the base, creating the first hole. Extracted the 20-pound foam foot from the silicone mold, then cut another hole adjacent to the first hole for overflow casting.
-
Mixed casting A (yellow) and B (clear) in equal weight proportions (e.g., if 5 oz of casting A is 7 grams, then mixed with 7 grams of casting B).
-
Thoroughly stirred the mixture and poured it into the silicone mold through the first hole until it overflowed from the second hole.
-
Waited until the casting dried, typically around 20 minutes.
-
Extracted the casting foot.
-
Replicated the remaining feet.
-
Sanded and applied a black paint finish.